
Cosmic ray removal
Almost all images from a CCD will include some number of cosmic rays, charged particles which bombard the Earth's upper atmosphere. Some of those will make it through the atmosphere and into your detector (the rate of cosmic rays will be much higher for cameras in space). Although the number of cosmic rays is roughly proportional to exposure time, there will be cosmic rays even in bias frames in which the chip is immediately read out.
This notebook explains how to remove cosmic rays from calibration images and science images.
Removal from calibration images
Click here to comment on this section on GitHub (opens in new tab).
The easiest way to remove cosmic rays from calibration images (bias, dark and flat images) is to combine them properly. Cosmic rays are, by their nature, random events that will affect different parts of each of the calibration images. A pixel affected by a cosmic ray in one of the dark images, for example, will almost certainly not be affected by a cosmic ray in any of the other dark images.
Combining those images by averaging (to reduce noise as much as possible) and sigma clipping (to exclude extreme pixels in individual images like the one with a cosmic ray) will eliminate the cosmic ray from the combined dark image. An alternative would be to combine the images using a median. A detailed description of each option is discussed in the section on image combination.
The method described below for removing cosmic rays from science images will not work well for removing them from calibration images and is unnecessary because they can be removed by properly combining the images.
Removal from science images
Click here to comment on this section on GitHub (opens in new tab).
One good technique for removing cosmic rays from an image is the LACosmic method originally developed and implemented for IRAF by Pieter G. van Dokkum. The original paper describing the method, which uses the sharp edges of cosmic rays to distinguish them from other sources in the image, is here.
The specific implementation of LACosmic used here is the astropy affiliated package Astro-SCRAPPY. If you use this code to remove cosmic rays you should cite both the original paper and Astro-SCRAPPY (citation details are on its web site). The code below never directly imports Astro-SCRAPPY because ccdproc provides a wrapper for it, so we called attention to it here.
Very important notes about using LACosmic
Click here to comment on this section on GitHub (opens in new tab).
There are a few things to be aware of before using the LACosmic technique. These are drawn from the advice van Dokkum provides under Notes for Users and the original paper.
- The images must be bias and dark subtracted.
- The images should be flat fielded, though the technique can be applied without flat fielding.
- The images should not have the sky subtracted before detecting the cosmic rays.
- The noise level in the image needs to be accurately measured.
- The image and the noise have to be in the same units, typically electrons.
- If there are pixels that are known to be bad (e.g. hot pixels, pixels
identified by
ccdmask) they should be masked out before detecting cosmic rays.
from pathlib import Path

import numpy as np
from matplotlib import pyplot as plt

from astropy.nddata import CCDData
from astropy.nddata.utils import block_replicate
from astropy import units as u
import ccdproc as ccdp
from photutils import detect_sources

from astrowidgets import ImageWidget

from convenience_functions import show_image, display_cosmic_rays
# Use custom style for larger fonts and figures
plt.style.use('guide.mplstyle')
from sidecar import Sidecar
Input image
Click here to comment on this section on GitHub (opens in new tab).
The image we will use in this notebook is one of the reduced images from Example 2 in the previous notebooks. It is an image of the field of the exoplanet Kelt-16b, taken with a thermo-electrically cooled CCD with read noise of 10$e^-$ and gain of $1.5~e^-$/ADU.
ex2_path = Path('example2-reduced')

ccd = CCDData.read(ex2_path / 'kelt-16-b-S001-R001-C084-r.fit')
show_image(ccd, cmap='gray')
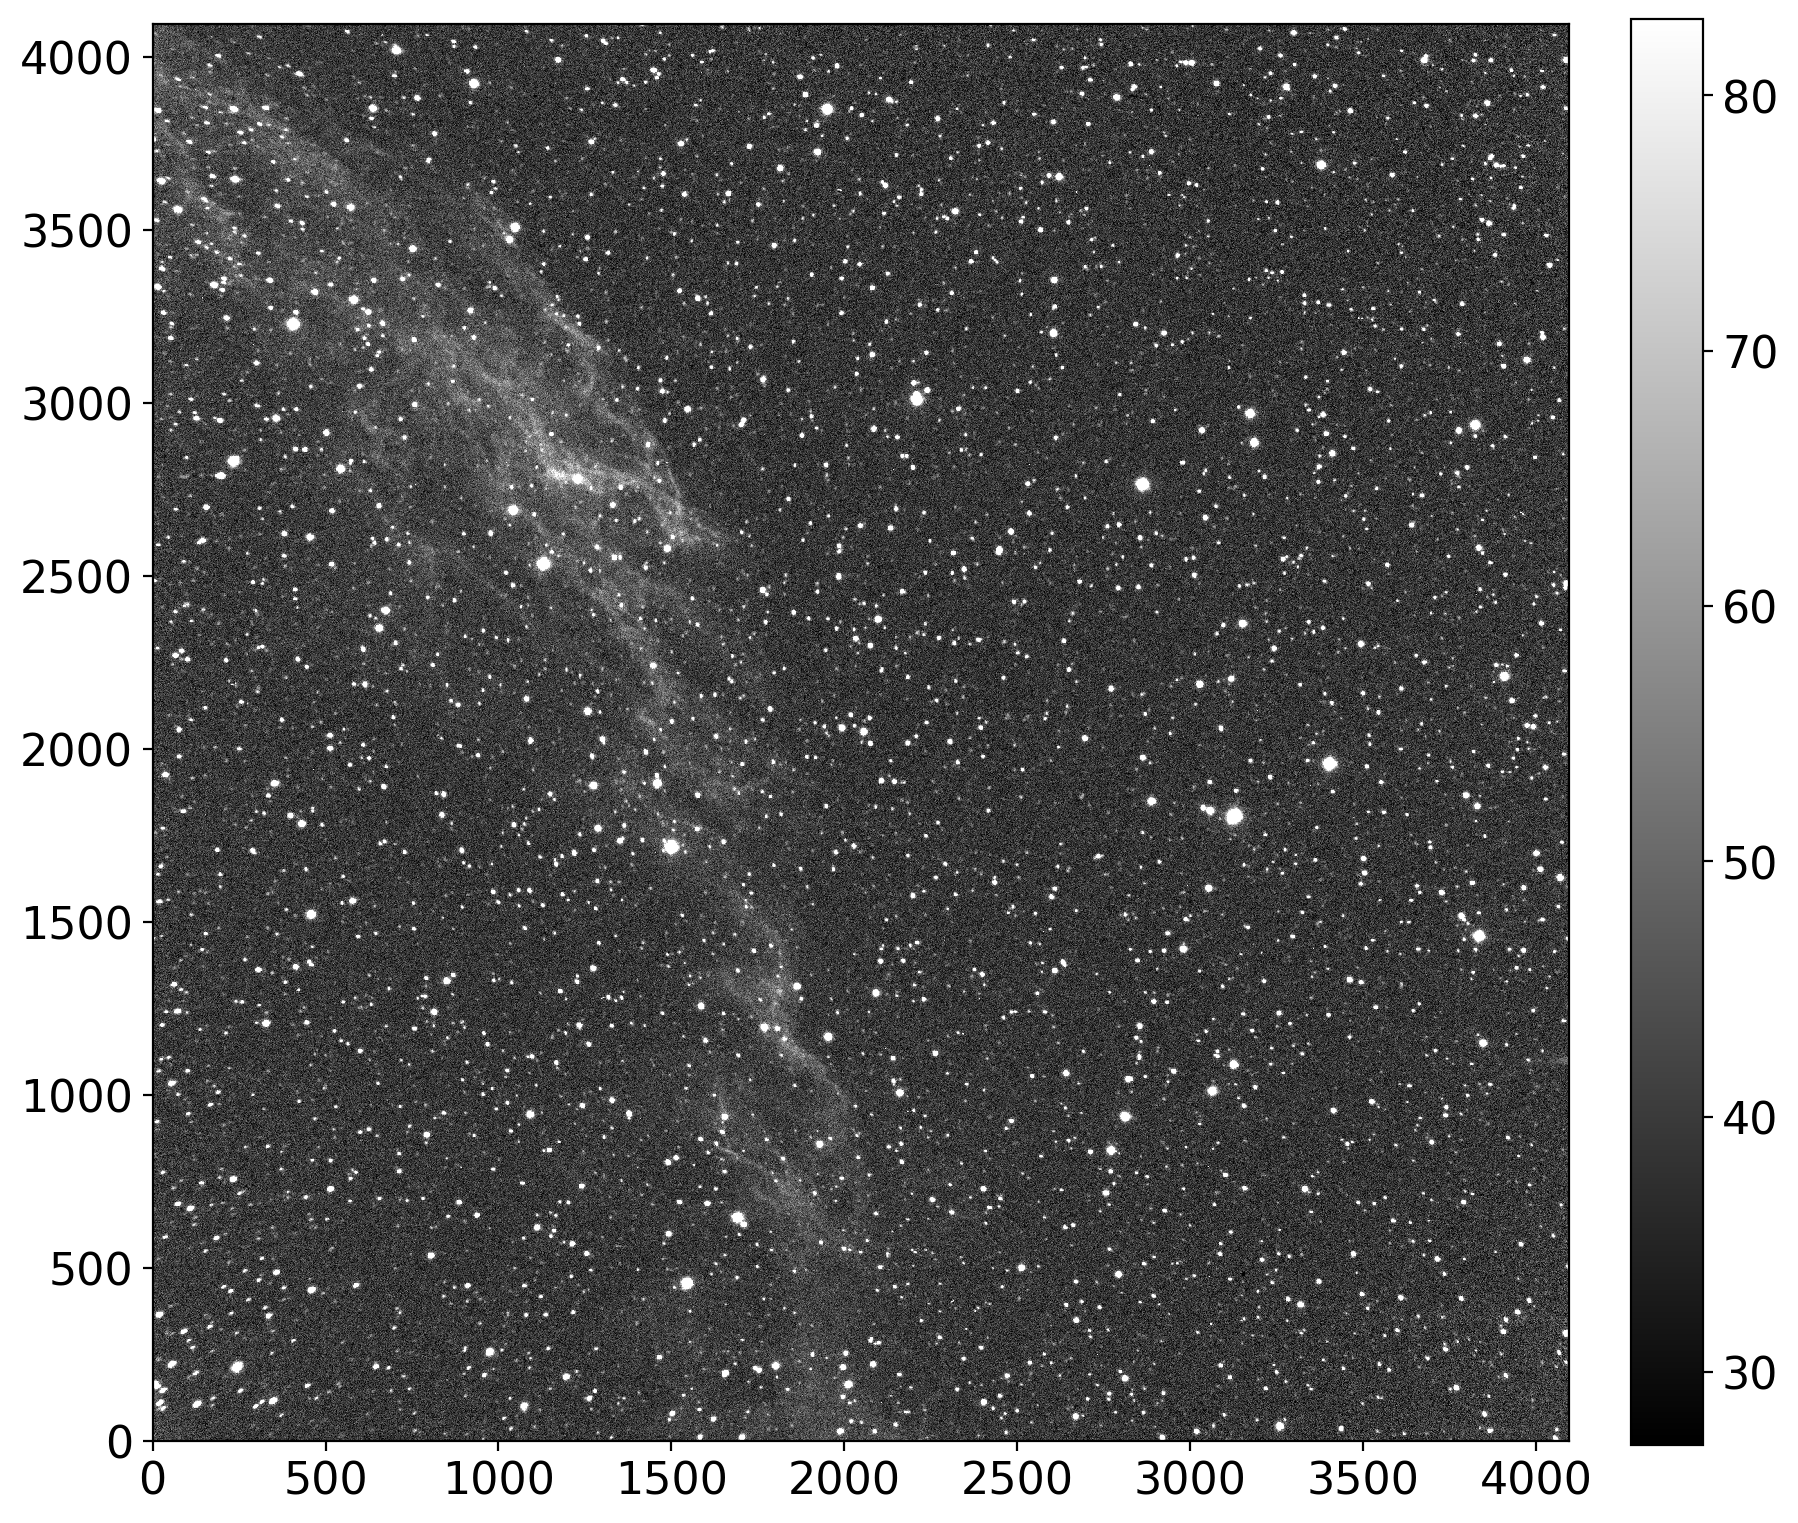
The unit of this image is ADU, so we need to multiply by the gain to convert to electrons.
ccd = ccdp.gain_correct(ccd, 1.5 * u.electron / u.adu)
Two masks were calculated earlier. Hot pixels, whose dark current cannot be
corrected, were identified by comparing dark frames of different exposure time. The
function ccdmask was used to identify other bad pixels; one example was a
column of pixels on the left side of the image.
We read in both of the masks, which are the same for all images, and combine using logical or.
dark_mask = CCDData.read(ex2_path / 'mask_from_dark_current.fits', unit=u.dimensionless_unscaled)
ccdmask_mask = CCDData.read(ex2_path / 'mask_from_ccdmask.fits', unit=u.dimensionless_unscaled)
combined_mask = dark_mask.data | ccdmask_mask.data
show_image(combined_mask, cmap='gray')
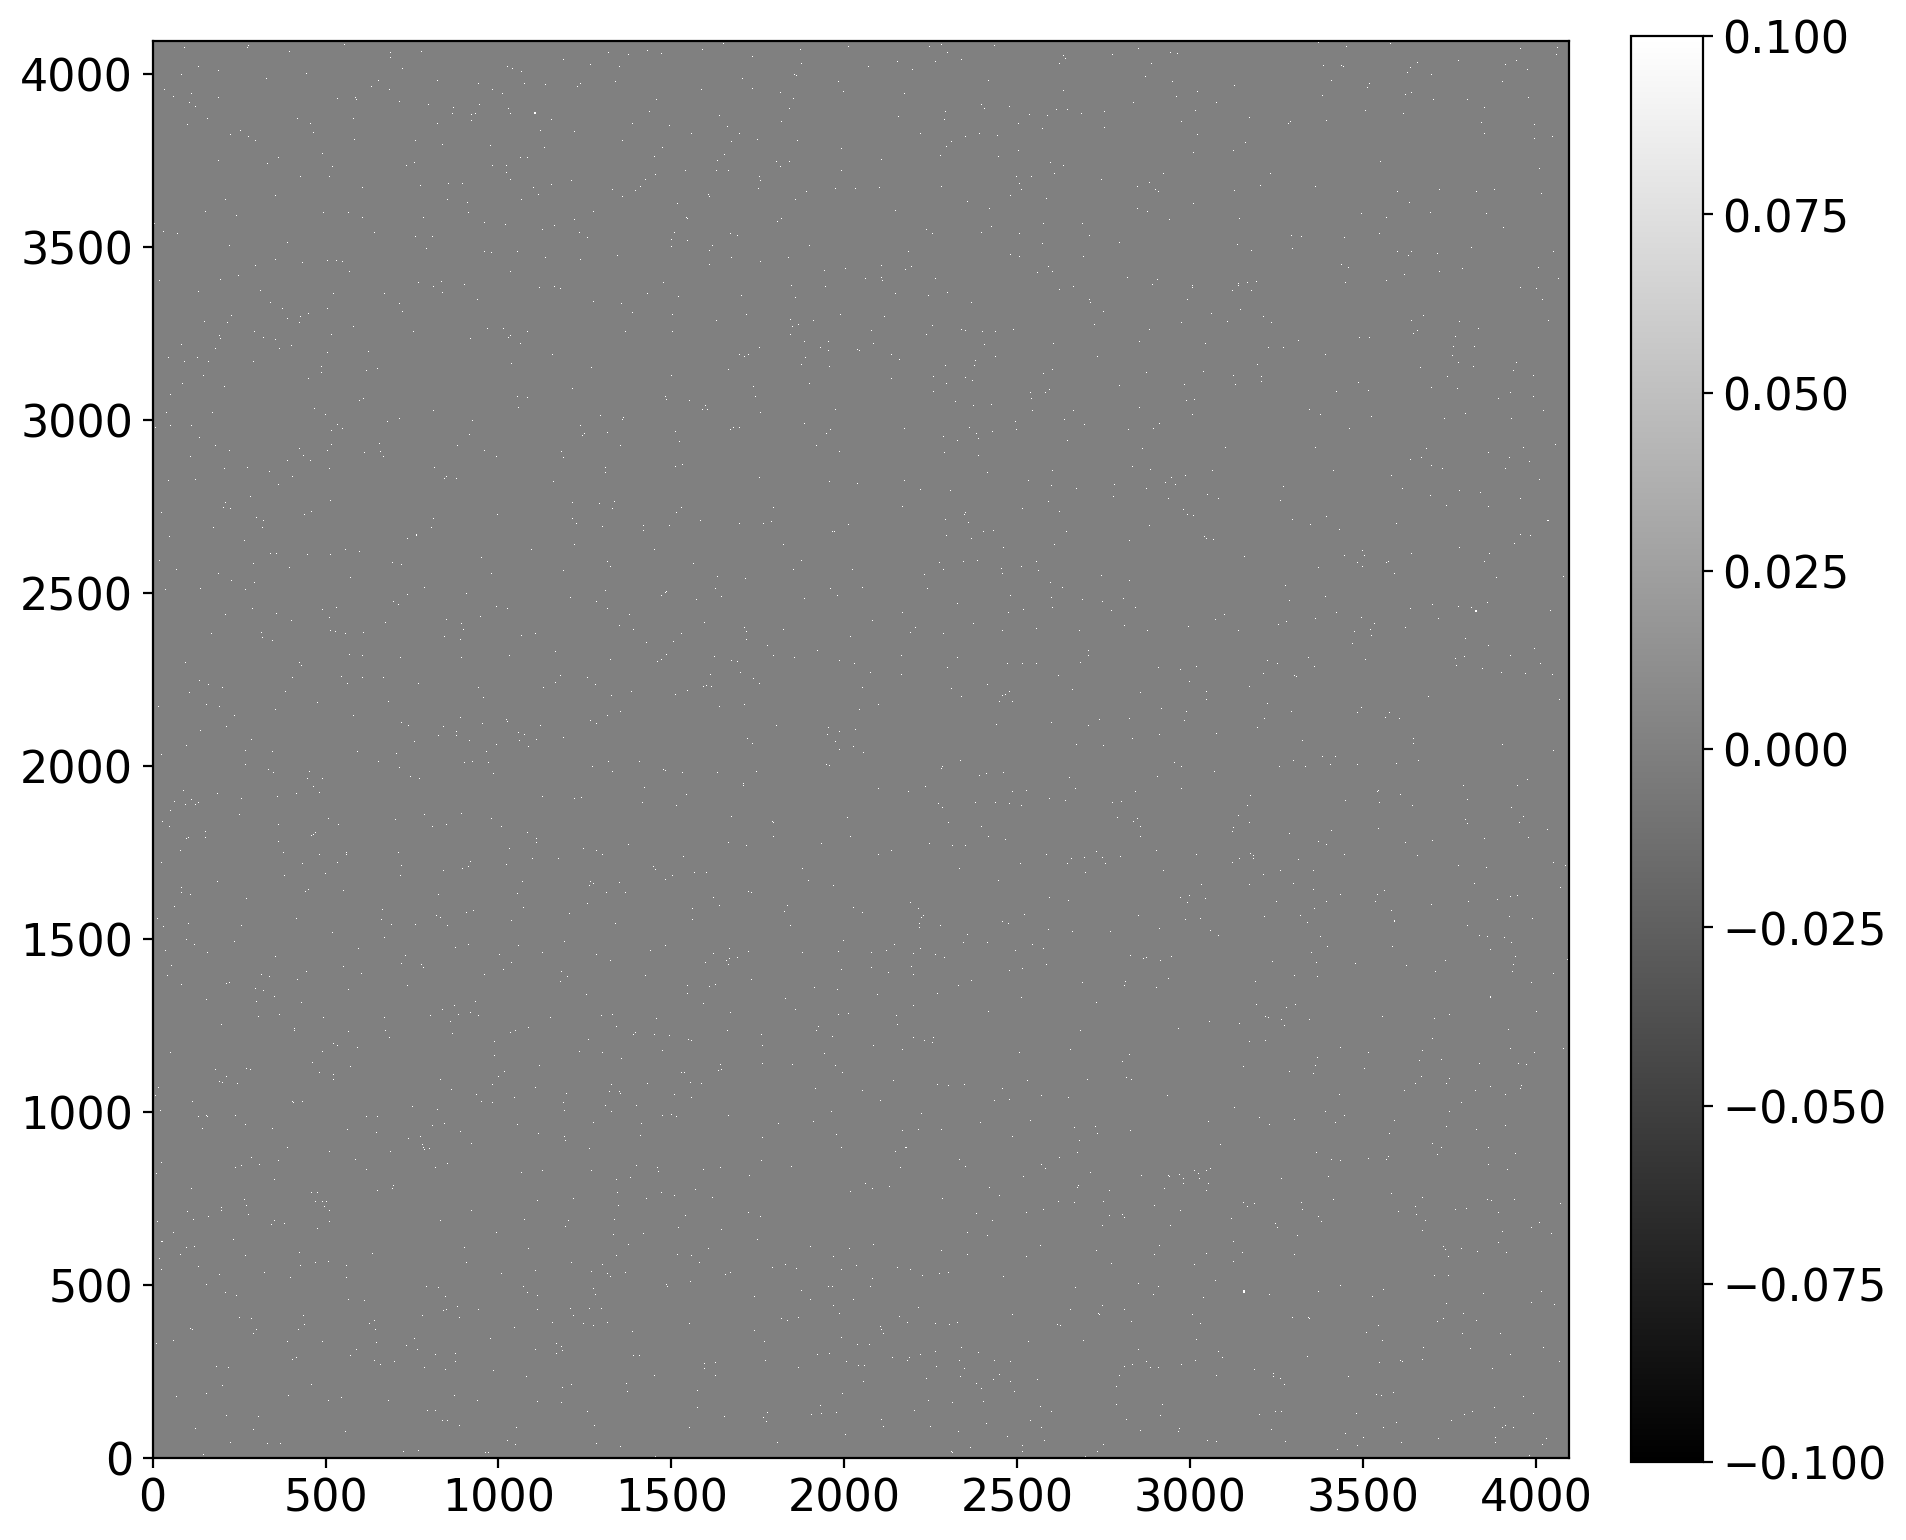
Excluding these pixels from cosmic ray detection ensures that only cosmic rays are identified.
The mask is now applied to the image of Kelt 16.
ccd.mask = combined_mask
Running LACosmic
Click here to comment on this section on GitHub (opens in new tab).
The actual invocation of LACosmic is fairly straightforward. The key parameters
are readnoise, the read noise, and sigclip, which determines how far above
the background a pixel needs to be to consider it a cosmic ray. There is no
hard-and-fast rule for selecting the proper value of sigclip. In the original
paper a value of 5 is recommended, but for this image it finds several thousand
pixels contaminated by cosmic rays. That is not plausible for an image taken
with a camera a thousand feet above sea level.
Higher values of sigclip reduce the number of cosmic rays found. The value
used below, 7, seemed to work well for this image, finding a total of roughly 70
pixels that are cosmic rays, and a couple dozen candidate cosmic rays that
extend across multiple pixels.
The function cosmicray_lacosmic from ccdproc returns a new image in which
the mask is True for pixels in which a cosmic ray was detected and False
otherwise. The data in the new image has values in the pixels in which cosmic
rays were identified replaced by interpolating the neighboring pixels.
We will take a look at the cosmic rays identified by LACosmic in a moment.
Expect the code below to take at a few tens of seconds to run.
%%time
new_ccd = ccdp.cosmicray_lacosmic(ccd, readnoise=10, sigclip=7, verbose=True)
The mask of new_ccd includes both cosmic rays identified by
cosmicray_lacosmic and the mask we applied to ccd above. To get only the
cosmic rays, we set the mask to False for all of those pixels that were masked
before LACosmic ran.
cr_mask = new_ccd.mask
cr_mask[ccd.mask] = False
The sum of the mask indicates how many pixels have been identified as cosmic rays.
new_ccd.mask.sum()
Examining the cosmic rays identified by LACosmic
Click here to comment on this section on GitHub (opens in new tab).
There are 70 pixels that have been flagged as cosmic rays. Looking through each of them individually would be tedious, at best. It would also presumably be difficult to decide visually if a single pixel tagged as a cosmic ray was actually a cosmic ray, but it would be helpful to look at the larger cosmic rays, i.e. those that span multiple pixels.
To identify those larger cosmic rays we will use the function detect_sources
from the package photutils, which identifies contiguous
pixels in an image via image segmentation. Though
detect_sources is intended for detecting extended or stellar sources in an image it happens to work very well for identifying extended cosmic rays in the mask generated by cosmicray_lacosmic.
The threshold below should be something less than 1 to ensure that only the masked pixels, i.e. those whose values are 1, are included as sources. The number of pixels is the number which must be adjacent (either by edge or by corner) to be considered a source.
threshold = 0.5
n_pixels = 3
crs = detect_sources(new_ccd.mask, threshold, n_pixels)
We first check to see how many of the pixels identified by LACosmic are part of these extended cosmic rays.
crs.areas
Looks like about 50% of the pixels marked as cosmic rays are extended over multiple adjacent pixels
In this particular science image there are three things being identified as cosmic rays:
- Actual cosmic rays.
- Single hot pixels, i.e. pixels with unusually high dark current.
These conclusions are not at all clear from what we have discussed in this notebook so far. They are based on a detailed examination of the images after looking at thumbnail views of the cosmic ray mask, the science image in which the cosmic rays were detected and the combined dark frame that was used to calibrate this science image.
That thumbnail view turned out to be a useful enough comparison that a function
called display_cosmic_rays is provided in convenience_functions.py that will
display the cosmic ray mask and as many additional comparison images as you
would like.
Since one of the images it turns out to be useful to look at in this example is the combined dark used in calibrating the science image, we load it.
ccd_dark = CCDData.read(ex2_path / 'combined_dark_90.000.fit')
One note about the argument only_display_rays below, which restricts the
cosmic rays that are displayed to that list. The list was chosen by first
viewing all of the cosmic rays and choosing a representative sample for
inclusion in this discussion. Display them all by setting
only_display_rays=None in the call to display_cosmic_rays.
images_to_display = [new_ccd.mask, ccd, ccd_dark]
image_titles = ['Mask', 'Science image', 'Combined dark']
display_cosmic_rays(crs, images_to_display, titles=image_titles,
                    only_display_rays=[0, 1, 14, 18]
                   )
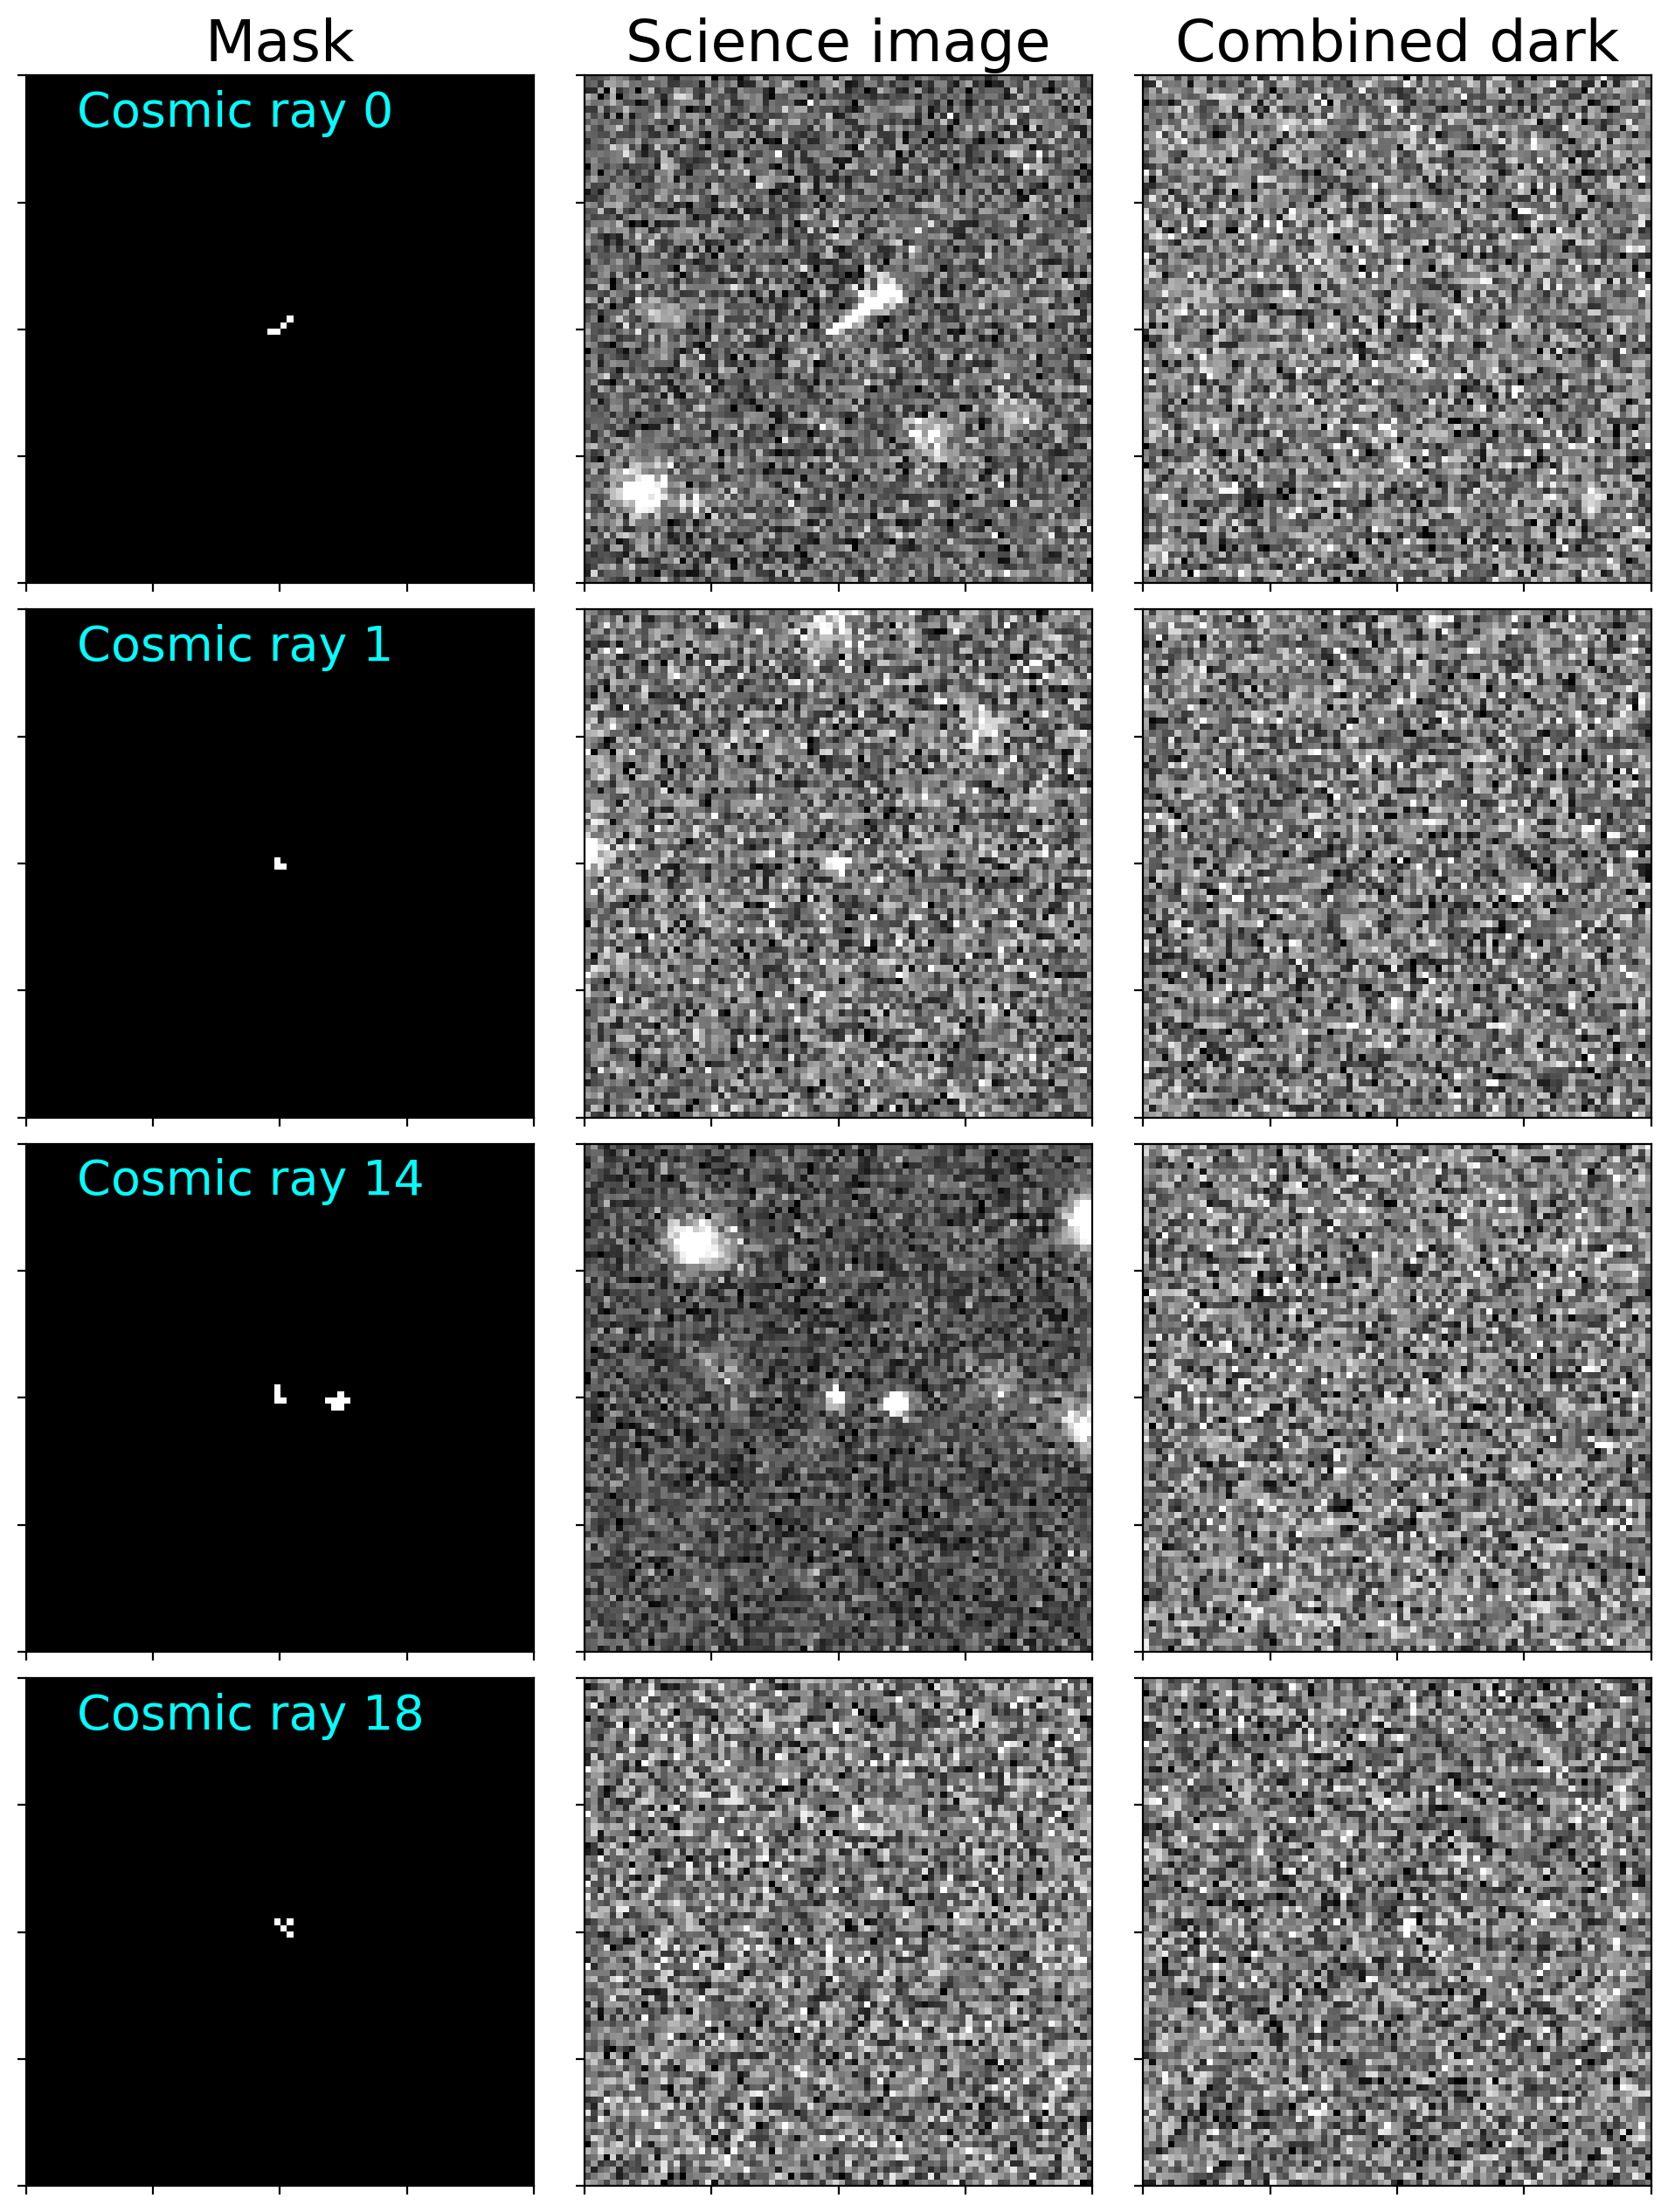
Discussion of sample cosmic rays
Click here to comment on this section on GitHub (opens in new tab).
The first three examples above, labeled "Cosmic ray 0," "Cosmic ray 1" and "Cosmic ray 14," are straightforward; each is actually a cosmic ray.
The fourth, "Cosmic ray 18", is not a cosmic ray, though it does correspond to a defect in the CCD. It is caused by a single hot pixel (dark current around 2$e^-$/sec) that has a high value in the combined dark frame. When that combined dark is subtracted from the science image it causes a large negative value in the value in the science image which ends up being identified as a cosmic ray.
Saving the mask with the image
Click here to comment on this section on GitHub (opens in new tab).
To save the full mask, including cosmic rays, hot pixels, and pixels identified
by ccdmask, set the mask of ccd to the mask of new_ccd. In some use cases
you might prefer to save new_ccd itself. The difference between the two is
that the pixel values in which there are cosmic rays have been replaced in
new_ccd by values representative of the surrounding pixels.
ccd.mask = new_ccd.mask

# This saves both the image and the mask
ccd.write('example-with-cosmic-rays.fits')
In the example above we masked the pixels known to be bad in all of the images before detecting cosmic rays. It is possible to do cosmic ray detection without prior masking. The downside of not masking is that many features that are not cosmic rays are identified as cosmic rays, and some real cosmic rays are not detected.
We begin with a fresh copy of the input image and run cosmic ray detection with the same parameters as above.
ccd = CCDData.read(ex2_path / 'kelt-16-b-S001-R001-C084-r.fit')
%%time
new_ccd_no_premask = ccdp.cosmicray_lacosmic(ccd, readnoise=10, sigclip=7, verbose=True)
print("Pre-masking detects {} cosmic ray pixels.\nNo pre-masking detects {} cosmic ray pixels.".format(new_ccd.mask.sum(), new_ccd_no_premask.mask.sum()))
Many of the additional pixels detected as cosmic rays are in the leftmost column of the image. The column is actually bad (it is covered on the CCD and receives no light).
crs_no_premask = detect_sources(new_ccd_no_premask.mask, threshold, n_pixels)
crs_no_premask.areas
Some of these are not cosmic rays
Click here to comment on this section on GitHub (opens in new tab).
The display below shows a few examples of areas identified by
cosmicray_lacosmic that are not actually cosmic rays. These false positives
are harmless because they reflect real problems with the detector and should be
masked out anyway.
More problematic are the cosmic rays that are undetected if the image is not masked first. As an example, the cosmic ray labeled "Cosmic ray 0" in the example above in which a mask was applied before detecting cosmic rays is not detected at all when no masking is done.
images_to_display = [new_ccd_no_premask.mask, ccd, ccd_dark]
image_titles = ['Mask', 'Science image', 'Combined dark']
display_cosmic_rays(crs_no_premask, images_to_display, titles=image_titles,
                    only_display_rays=[0, 1, 2]
                   )
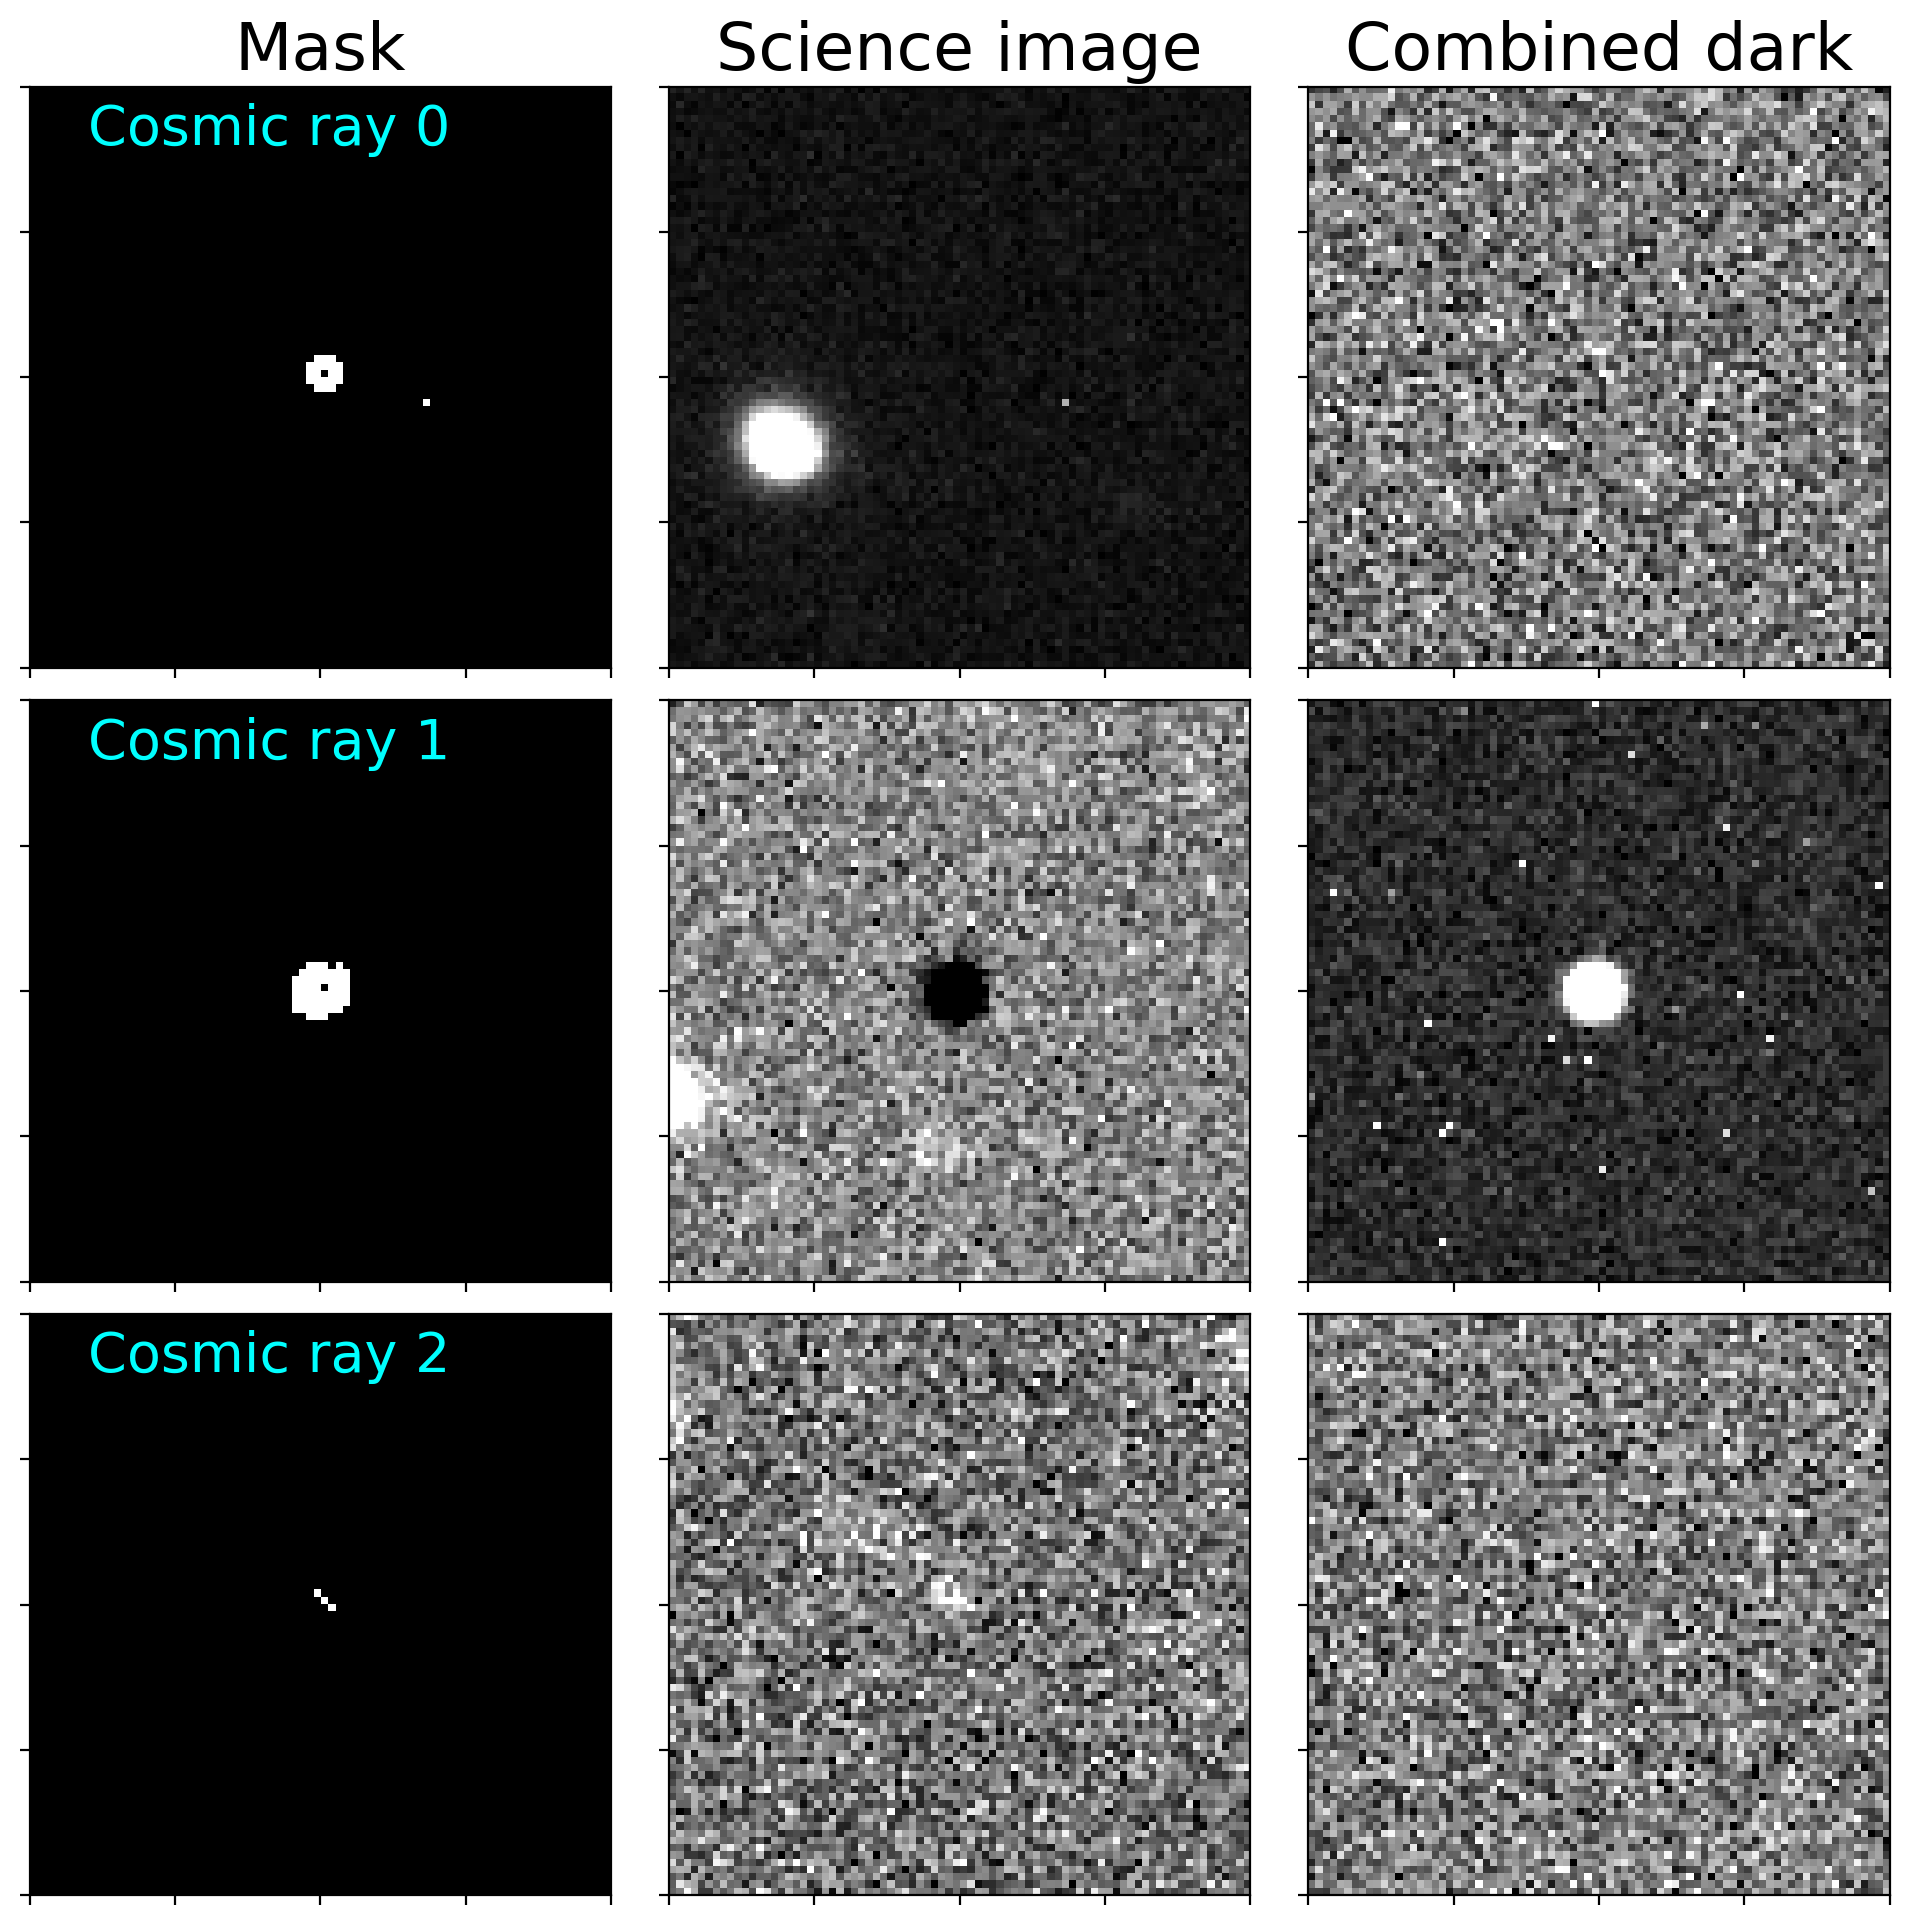
The first example above is the bad column on the left side of the image.
The one label "Cosmic ray 1" is caused by a single hot pixel with a large count in the dark frames, which leads to a large negative value in the calibrated science image. LACosmic tags that pixel and many around it as cosmic rays. While the individual hot pixel should be masked, the ones around it do not need to be masked.
The final example, "Cosmic ray 3,", looks a lot like a star. It is, in fact, the after-image of one of the bright stars in the field of Kelt 16b. Bright stars in the field of view can deposit enough charge that is does not dissipate between images. Typically the effect can be avoided altogether by "pre-flashing" the CCD.
Since one cannot pre-flash after the images have been taken, we are stuck doing the next best thing: masking out this part of the images. The masking should be done at the stage at which how pixels are being identified because all of these pixels will be identified as how.