
The purpose of calibrating bias images is three-fold:
- Subtract overscan if you have decided your science will be better if you subtract overscan. See this discussion of overscan for some guidance.
- Trim the overscan region off of the image if it is present, regardless of whether you have chosen to subtract the overscan.
- Combine the bias images into a "combined" bias to be used in calibrating the rest of the images. The purpose of combining several images is to reduce as much as possible the read noise in the combined bias.
The approach in this notebook will be to reduce a single image, look at the effects the reduction step had on that image and then demonstrate how to calibrate a folder containing several images of that type.
from pathlib import Path
import os

from astropy.nddata import CCDData
from astropy.visualization import hist
import ccdproc as ccdp
import matplotlib.pyplot as plt
import numpy as np

from convenience_functions import show_image
# Use custom style for larger fonts and figures
plt.style.use('guide.mplstyle')
See the Preface notebook for download links for all data.
Decide where to put your Example 1 calibrated images
Click here to comment on this section on GitHub (opens in new tab).
Though it is possible to overwrite your raw data with calibrated images that is
a bad idea. Here we create a folder called example1-reduced that will contain
the calibrated data and create it if it doesn't exist.
calibrated_data = Path('.', 'example1-reduced')
calibrated_data.mkdir(exist_ok=True)
example_cryo_path = Path('example-cryo-LFC')
files = ccdp.ImageFileCollection(example_cryo_path)
files.summary['file', 'imagetyp', 'filter', 'exptime', 'naxis1', 'naxis2']
darks_only = ccdp.ImageFileCollection(example_cryo_path / 'darks')
darks_only.summary['file', 'imagetyp', 'exptime']
Please see the discussion of this camera in
the overscan notebook-at-Palomar) for the appropriate overscan region
to use for this camera. Note, in particular, that it differs from the the value
given in the BIASSEC keyword in the header of the images.
The astropy affiliated package ccdproc provides two useful functions here:
subtract_overscanfor subtracting the overscan from the image, andtrim_imagefor trimming off the overscan.
First, let's see what the values of BIASSEC which sometimes (but not always)
indicates that there is is overscan and which part of the chip is the overscan,
and CCDSEC, which is sometimes, but not always present, and indicates which
part of the chip light hit.
Note that neither of these are standard; sometimes, for example, trimsec is
used instead of ccdsec, and there are likely other variants. Some images may
have neither keyword in the header. That does not necessary indicate that
ovserscan isn't present. The best advice is to carefully check the documentation
for the camera you are using.
files.summary['file', 'imagetyp', 'biassec', 'ccdsec', 'datasec'][0]
The fits header claims the overscan extends from the 2049$^{th}$ column to the end of the image (this is one-based indexing) and that the part of the image exposed to light extends over all rows and from the first column to the 2048$^{th}$ column (again, this is one-indexed).
FITS vs Python indexing
Click here to comment on this section on GitHub (opens in new tab).
There are two differences between FITS and Python in terms of indexing:
- Python indexes are zero-based (i.e. numbering starts at zero), FITS indexes are one-based (i.e. numbering starts at 1).
- The order of the indexes is swapped.
For example, the FITS representation of the part of the chip exposed to
light is [1:2048,1:4128]. To access that part of the data from a numpy array
in Python, switch the order so that the indexing looks like this: [0:4128,
0:2048] (or, more compactly [:, :2048]). Note that the ending indexes given
here for python are correct because the second part of a range (after the colon)
is not included in the array slice. For example, 0:2048 starts at 0 (the
first pixel) and goes up to but not including 2048, so the last pixel included
is 2047 (the 2048$^{th}$ pixel).
As discussed in the overscan notebook-at-Palomar), the useful
overscan region for this camera starts at the 2055$^{th}$ column, not column
2049 as indicated by the BIASSEC keyword in the header. This situation is not
unusual; column 2049 is the first of the columns masked by the manufacturer from
light but there is some leakage into this region from the rest of the CCD.
If you are going to overscan you need to carefully examine the overscan in a few representative images to understand which part of the overscan to use.
In what follows, we will use for the overscan the region (Python/numpy indexing)
[:, 2055:].
Using subtract_overscan is reasonably straightforward, as shown in the cell
below.
raw_biases = files.files_filtered(include_path=True, imagetyp='BIAS')
first_bias = CCDData.read(raw_biases[0], unit='adu')
bias_overscan_subtracted = ccdp.subtract_overscan(first_bias, overscan=first_bias[:, 2055:], median=True)
Next, we trim off the full overscan region (not just the part we used for subtracting overscan)
trimmed_bias = ccdp.trim_image(bias_overscan_subtracted[:, :2048])
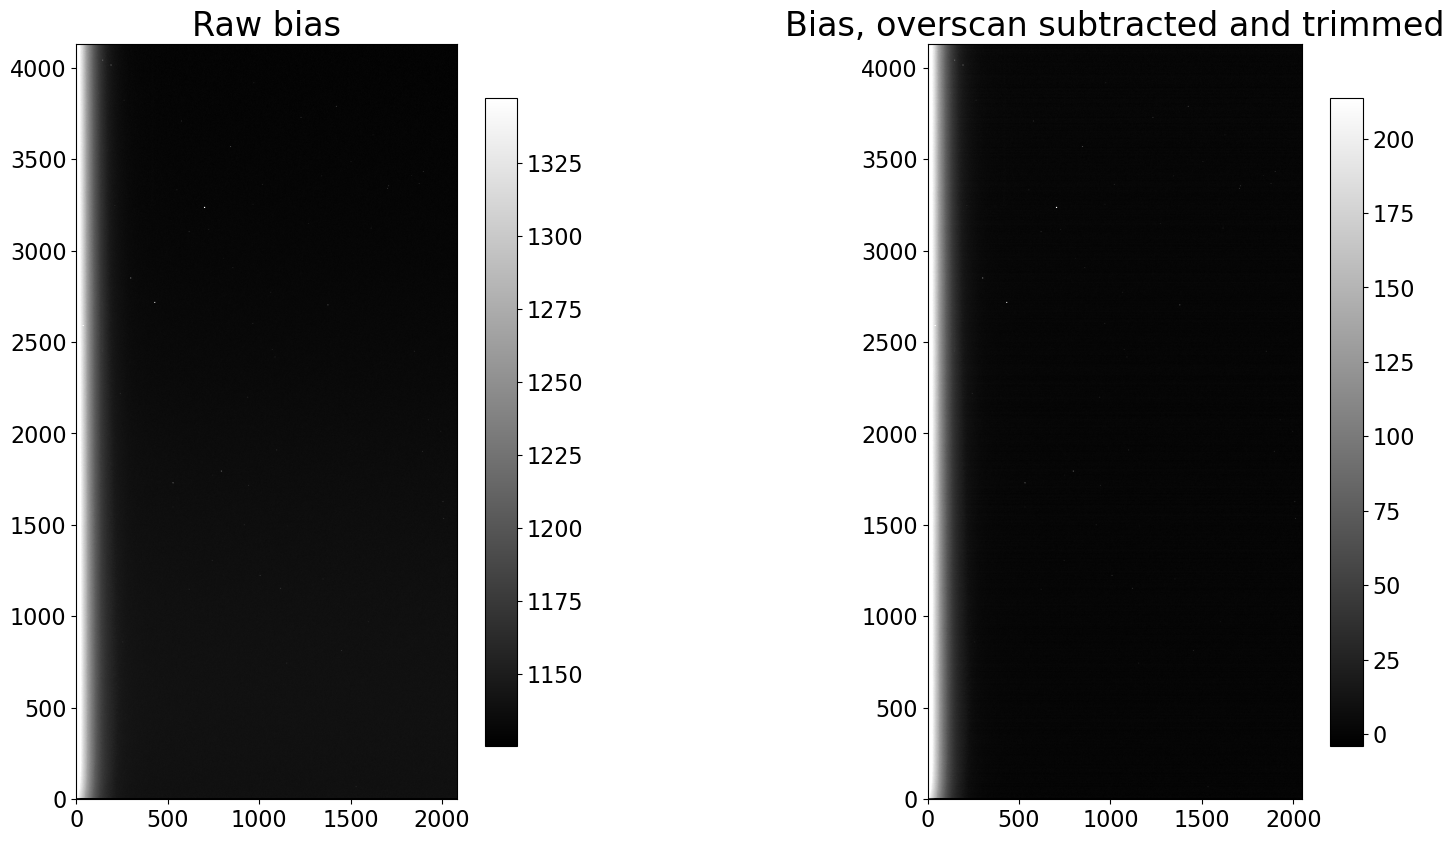
fig, (ax1, ax2) = plt.subplots(1, 2, figsize=(20, 10))

show_image(first_bias.data, cmap='gray', ax=ax1, fig=fig)
ax1.set_title('Raw bias')
show_image(trimmed_bias.data, cmap='gray', ax=ax2, fig=fig)
ax2.set_title('Bias, overscan subtracted and trimmed')
Discussion
Click here to comment on this section on GitHub (opens in new tab).
Visually, the images look nearly identical before and after calibration. The only prominent difference is a shift in the pixel values, as one would expect from subtracting the same value from each pixel in an image. It simply shifts the zero point.
There is ones other important difference between the images: the input image
uses 32MB of memory while the calibrated, overscan-subtracted image uses roughly
128MB. The input image is stored as unsigned 16-bit integers; the calibrated
image is stored as floating point numbers, which default in python to 64-bit
floats. The memory size is also the size the files will have when written to
disk (ignoring any compression). One can reduce the memory and disk footprint by
changing the dtype of the image: trimmed_bias.dtype = 'float32'. It is best
to do this just before writing the image out because arithmetic operations on
the image may convert its dtype back to float64.
Processing each of the bias images individually would be tedious, at best.
Instead, we can use the ImageFileCollection we created above to
loop over only the bias images, saving each in the folder calibrated_data. In
this example the files are saved uncompressed because the Python library for
compressing gzip files is extremely slow.
for ccd, file_name in files.ccds(imagetyp='BIAS',            # Just get the bias frames
                                 ccd_kwargs={'unit': 'adu'}, # CCDData requires a unit for the image if
                                                             # it is not in the header
                                 return_fname=True           # Provide the file name too.
                                ):
        # Subtract the overscan
    ccd = ccdp.subtract_overscan(ccd, overscan=ccd[:, 2055:], median=True)

    # Trim the overscan
    ccd = ccdp.trim_image(ccd[:, :2048])

    # Save the result
    ccd.write(calibrated_data / file_name)
Let's check that we really did get the images we expect by creating an
ImageFileCollection for the reduced folder and displaying the size
of each image. We are expecting the images to be 2048 × 4128, and that there
will be the same number of reduced bias images as input bias images (six).
reduced_images = ccdp.ImageFileCollection(calibrated_data)
reduced_images.summary['file', 'imagetyp', 'naxis1', 'naxis2']
If you are not subtracting overscan then the only manipulation you may need to do is trimming the overscan from the images. If there is no overscan region in your images then even that is unnecessary.
Though it is possible to overwrite your raw data with calibrated images that is
a bad idea. Here we create a folder called example2-reduced that will contain
the calibrated data and create it if it doesn't exist.
calibrated_data = Path('.', 'example2-reduced')
calibrated_data.mkdir(exist_ok=True)
files = ccdp.ImageFileCollection('example-thermo-electric')
files.summary['file', 'imagetyp', 'filter', 'exptime', 'naxis1', 'naxis2']
Please see the discussion of this camera in the overscan notebook for a discussion of the overscan region of this camera. The overscan for this camera is not useful but should be trimmed out at this stage.
These headers have some information in the keywords BIASSEC and TRIMSEC
indicating, in the FITS numbering convention, the overscan region and the
science region of the chip.
files.summary['file', 'imagetyp', 'biassec', 'trimsec'][0]
Based on this, and the decision not to subtract overscan for this camera, we will only need to trim the overscan region off of the images. See the discussion at FITS vs Python indexing, above, for some details about the difference between FITS and Python indexing. Essentially, to get Python indexes from FITS, reverse the order and subtract one.
Trim the overscan (one sample image)
Click here to comment on this section on GitHub (opens in new tab).
The function trim_image from ccdproc removes a
portion of the image and updates the image metadata as needed.
Below we get the first bias image.
raw_biases = files.files_filtered(include_path=True, imagetyp='BIAS')

first_bias = CCDData.read(raw_biases[0], unit='adu')
There two ways of specifying the region to trim. One is to slice the image in
Python; the other is to use the fits_section argument to trim_image.
The cell below uses a FITS-style section.
trimmed_bias_fits = ccdp.trim_image(first_bias, fits_section='[1:4096, :]')
The cell below does the same trimming as the one above, but with Python-style slicing.
trimmed_bias_python = ccdp.trim_image(first_bias[:, :4096])
np.testing.assert_allclose(trimmed_bias_python, trimmed_bias_fits)
As in Example 1, above, we can use the
ImageFileCollection we created to loop over only the bias images,
saving each in the folder calibrated_data.
for ccd, file_name in files.ccds(imagetyp='BIAS',            # Just get the bias frames
                                 return_fname=True           # Provide the file name too.
                                ):
    # Trim the overscan
    ccd = ccdp.trim_image(ccd[:, :4096])

    # Save the result
    ccd.write(calibrated_data / file_name)
Example 3: No overscan at all
Click here to comment on this section on GitHub (opens in new tab).
If there is no overscan then there is, in principle, nothing to be done with the bias frames. It may be convenient to copy them to the directory with the rest of your reduced images. The code below does that.
calibrated_data = Path('.', 'example3-reduced')
calibrated_data.mkdir(exist_ok=True)

biases = files.files_filtered(imagetyp='BIAS', include_path=True)

import shutil

for bias in biases:
    shutil.copy(bias, calibrated_data)